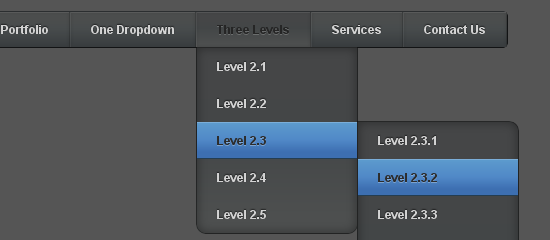
We are back with a cool Multi-level Drop Down Navigation Menu made up of pure CSS with additional effects using CSS3.0 properties such as border-radius, box-shadow, text-shadow and linear gradient. This navigation menu renders perfectly on Firefox, Chrome and also Safari.
HTML
Here is the basic HTML code for this multi-level navigation menu.
<div id="nav">
<ul>
<li><a href="#">Home</a></li>
<li><a href="#">About Us</a></li>
<li><a href="#">Our Portfolio</a></li>
<li><a href="#">One Dropdown</a>
	<ul>
	<li><a href="#">Level 2.1</a></li>
	<li><a href="#">Level 2.2</a></li>
	<li><a href="#">Level 2.3</a></li>
	<li><a href="#">Level 2.4</a></li>
	<li><a href="#">Level 2.5</a></li>
	</ul>
</li>
<li><a href="#">Three Levels</a>
	<ul>
	<li><a href="#">Level 2.1</a></li>
	<li><a href="#">Level 2.2</a></li>
	<li><a href="#">Level 2.3</a>
		<ul>
		<li><a href="#">Level 2.3.1</a></li>
		<li><a href="#">Level 2.3.2</a></li>
		<li><a href="#">Level 2.3.3</a></li>
		<li><a href="#">Level 2.3.4</a></li>
		<li><a href="#">Level 2.3.5</a></li>
		<li><a href="#">Level 2.3.6</a></li>
		<li><a href="#">Level 2.3.7</a></li>
		</ul>
	</li>
	<li><a href="#">Level 2.4</a></li>
	<li><a href="#">Level 2.5</a></li>
	</ul>
</li>
<li><a href="#">Services</a></li>
<li><a href="#">Contact Us</a></li>
</ul>
</div>
You would see a skeleton of links without any styles added to that HTML code like shown in the image below.

CSS
Now we’ll start to give the skin to that skeleton of links (stylize) with CSS. Here is the basic CSS code for the menu.
#nav {
    	float: left;
   	font: bold 12px Arial, Helvetica, Sans-serif;
    	border: 1px solid #121314;
    	border-top: 1px solid #2b2e30;
    	-webkit-border-radius: 5px;
    	-moz-border-radius: 5px;
    	border-radius: 5px;
    	overflow: hidden;
}

#nav ul {
	margin:0;
	padding:0;
	list-style:none;
}

#nav ul li {
	float:left;
}

#nav ul li a {
   	float: left;
	color:#d4d4d4;
    	padding: 10px 20px;
	text-decoration:none;
    	background:#3C4042;
 	background: -webkit-gradient( linear, left bottom, left top, color-stop(0.09, rgb(59,63,65)), color-stop(0.55, rgb(72,76,77)), color-stop(0.78, rgb(75,77,77)) );
	background: -moz-linear-gradient( center bottom, rgb(59,63,65) 9%, rgb(72,76,77) 55%, rgb(75,77,77) 78% );
	background: -o-linear-gradient( center bottom, rgb(59,63,65) 9%, rgb(72,76,77) 55%, rgb(75,77,77) 78% );
	box-shadow: 0 1px 0 rgba(255, 255, 255, 0.1) inset, 0 0 5px rgba(0, 0, 0, 0.1) inset;
	border-left: 1px solid rgba(255, 255, 255, 0.05);
        border-right: 1px solid rgba(0,0,0,0.2);
 	text-shadow: 0 -1px 1px rgba(0, 0, 0, 0.6);
}

#nav li ul {
    	background:#3C4042;
    	background-image: -webkit-gradient( linear, left bottom, left top, color-stop(0.09, rgb(77,79,79)), color-stop(0.55, rgb(67,70,71)), color-stop(0.78, rgb(69,70,71)) );
    	background-image: -moz-linear-gradient( center bottom, rgb(77,79,79) 9%, rgb(67,70,71) 55%, rgb(69,70,71) 78% );
    	background-image: -o-linear-gradient( center bottom, rgb(77,79,79) 9%, rgb(67,70,71) 55%, rgb(69,70,71) 78% );
    	border-radius: 0 0 10px 10px;
    	-moz-border-radius: 0 0 10px 10px;
    	-webkit-border-radius: 0 0 10px 10px;
    	left: -999em;
    	margin: 35px 0 0;
    	position: absolute;
    	width: 160px;
    	z-index: 9999;
    	box-shadow: 0 0 15px rgba(0, 0, 0, 0.4) inset;
    	-moz-box-shadow: 0 0 15px rgba(0, 0, 0, 0.4) inset;
    	-webkit-box-shadow: 0 0 15px rgba(0, 0, 0, 0.4) inset;
    	border: 1px solid rgba(0, 0, 0, 0.5);
}

#nav li ul a {
    	background: none;
    	border: 0 none;
    	margin-right: 0;
    	width: 120px;
    	box-shadow: none;
    	-moz-box-shadow: none;
    	-webkit-box-shadow: none;
    	border-bottom: 1px solid transparent;
    	border-top: 1px solid transparent;
}
Once you’ve added that code, you’ll see a stylized navigation menu without dropdowns and hover effects as shown in the image below.
Add the following css code to make the drop down and submenus visible and also for the hover effects.
#nav ul li a:hover,
#nav ul li:hover > a {
    	color: #252525;
    	background:#3C4042;
	background: -webkit-gradient( linear, left bottom, left top, color-stop(0.09, rgb(77,79,79)), color-stop(0.55, rgb(67,70,71)), color-stop(0.78, rgb(69,70,71)) );
	background: -moz-linear-gradient( center bottom, rgb(77,79,79) 9%, rgb(67,70,71) 55%, rgb(69,70,71) 78% );
	background: -o-linear-gradient( center bottom, rgb(77,79,79) 9%, rgb(67,70,71) 55%, rgb(69,70,71) 78% );
    	text-shadow: 0 1px 0 rgba(255, 255, 255, 0.2), 0 -1px #000;

}

#nav li ul a:hover,
#nav ul li li:hover > a  {
    color: #2c2c2c;
  	background: #5C9ACD;
	background: -webkit-gradient( linear, left bottom, left top, color-stop(0.17, rgb(61,111,177)), color-stop(0.51, rgb(80,136,199)), color-stop(1, rgb(92,154,205)) );
	background: -moz-linear-gradient( center bottom, rgb(61,111,177) 17%, rgb(80,136,199) 51%, rgb(92,154,205) 100% );
	background: -o-linear-gradient( center bottom, rgb(61,111,177) 17%, rgb(80,136,199) 51%, rgb(92,154,205) 100% );
    	border-bottom: 1px solid rgba(0,0,0,0.6);
    	border-top: 1px solid #7BAED9;
    	text-shadow: 0 1px rgba(255, 255, 255, 0.3);
}


#nav li:hover ul {
    	left: auto;
}


#nav li li ul {
    	margin: -1px 0 0 160px;
    	-webkit-border-radius: 0 10px 10px 10px;
    	-moz-border-radius: 0 10px 10px 10px;
    	border-radius: 0 10px 10px 10px;
    	visibility:hidden;
}

#nav li li:hover ul {
    	visibility:visible;
}
So, it will look like this after you added the code shown above. However, corners of the first and last menu links of the submenus won’t look curved till you add the next piece of CSS code.
#nav ul ul li:last-child > a {
	-moz-border-radius:0 0 10px 10px;
	-webkit-border-radius:0 0 10px 10px;
	border-radius:0 0 10px 10px;
}

#nav ul ul ul li:first-child > a {
	-moz-border-radius:0 10px 0 0;
	-webkit-border-radius:0 10px 0 0;
	border-radius:0 10px 0 0;
}
So now, the first and last submenu links will have rounded borders as shown in the image.
And that’s all. You may want to look at the live demo of the Navigation menu or download the resource files. Please don’t forget to share your views and opinions about this Navigation menu tutorial!


