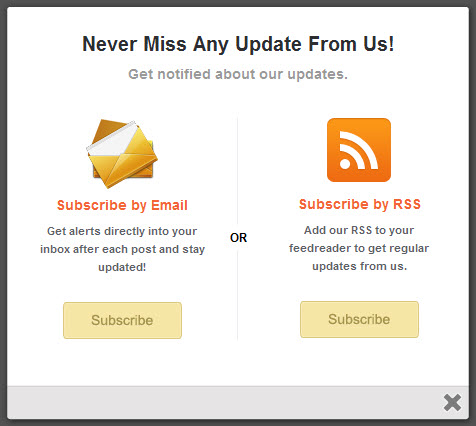
Recently I have seen many blogs using a modal window subscribe box on page load and one such modal subscription box inspired me to create this tutorial. In order to achieve the modal window, I have used Colorbox. The reason why I use Colorbox is due to its browser compatibility and it offers various other options that can be used in it. So let me put across what I have used to create this simple popup/modal subscribe box
- ColorBox
- jQuery cookie tracking
- CSS to brush up its look
Basically the subscribe which I made has two option for your reader to choose between email subscription and RSS feed.
HTML
Lets make a simple page to easily understand how this works
<!DOCTYPE html>
<html lang="en">
	<head>
	<meta charset=utf-8 />
	<title>Modal / Popup Subscription Box</title>
	<link media="screen" rel="stylesheet" href="colorbox.css" />
	<link media="screen" rel="stylesheet" href="pop.css" />
	<script src="https://ajax.googleapis.com/ajax/libs/jquery/1.6/jquery.min.js"></script>
	<script src="js/jquery.colorbox-min.js"></script>
</head>
<body>

	<!-- This contains the hidden content for inline calls -->
	<div style='display:none'>
		<div id='subscribe' style='padding:10px; background:#fff;'>
		<h2 class="box-title">Never Miss Any Update From Us!</h2>
                <h3 class="box-tagline">Get notified about our updates.</h3>

                <!-- BEGIN #subs-container -->
                <div id="subs-container" class="clearfix">

                    <!-- BEGIN .box-side -->
                	<div class="box-side left">

                        <div class="box-icon"><a class="email" href="http://feedburner.google.com/fb/a/mailverify?uri=YOUR FEEDBURNER ID"><img src="images/email.png"/></a></div>

                        <h4><a href="http://feedburner.google.com/fb/a/mailverify?uri=YOUR FEEDBURNER ID">Subscribe by Email</a></h4>

                        <h5>Get alerts directly into your inbox after each post and stay updated!</h5>

                        <a class="sub" href="http://feedburner.google.com/fb/a/mailverify?uri=YOUR FEEDBURNER ID" title="Subscribe Now!">Subscribe</a>

                    <!-- END .box-side -->
                    </div>

                    <div id="box-or">OR</div>

                    <!-- BEGIN .box-right -->
                	<div class="box-side right">

                        <div class="box-icon"><a class="rss" href="http://feeds.feedburner.com/YOUR FEEDBURNER ID"><img src="images/rss.png"/></a></div>

                        <h4><a href="http://feeds.feedburner.com/YOUR FEEDBURNER ID">Subscribe by RSS</a></h4>

                        <h5>Add our RSS to your feedreader to get regular updates from us.</h5>

                        <a class="sub" href="http://feeds.feedburner.com/YOUR FEEDBURNER ID" title="Subscribe Now!">Subscribe</a>

                    <!-- END .box-side -->

                    </div>

                <!-- BEGIN #subs-container -->
                </div>
		</div>
	</div>
</body>
</html>
Now the above code has all the texts and contents that are used in the modal subscribe box. If you wish to change the texts and the feedburner ID, you can change it.
CSS
In order to style up the subscribe box we are using CSS and at some place you can see some CSS3 effects. The images used in the CSS are inside the download folder. So while you try this, make sure that your have included the exact image path.
In the downloadable folder you can see two CSS files. Once is for the colorbox and the other for styling up the elements in the subscribe box. Since we don’t you confuse, we kept it as two.
pop.css
#subscribe {
	font: 12px/1.2 Arial,Helvetica,san-serif;
}

#subscribe a,
#subscribe a:hover,
#subscribe a:visited {
	text-decoration:none;
}

.box-title {
    color: #2C2D31;
    font-size: 20px;
    font-weight: bold;
    margin: 10px 0;
    text-align: center;
}
.box-tagline {
    color: #999;
    font-size: 14px;
    margin: 0;
    text-align: center;
}
#subs-container {
	padding: 35px 0 30px 0;
	position: relative;
}
.box-side {
	width: 170px;
	text-align: center;
}
.box-side.left {
    padding: 0 30px 0 15px;
	border-right: 1px solid #ecedf3;
}
.box-side.right {
	float: right;
    margin-top: -223px;
	margin-right: 10px;
}
.box-icon {
	width: 72px;
	height: 54px;
	padding: 6px 0 0 0;
	margin: 0 auto;
}
.box-icon a.rss{
	display: block;
	width: 70px;
	height: 56px;
	margin: 0 auto;
}
.box-icon a{
	display: block;
	width: 72px;
	height: 54px;

}
.box-icon a.email img,
.box-icon a.rss img {
    margin: -5px 0 0;
	border: 0 none;
}
.box-side h4,
.box-side h4 a {
	font-size: 14px;
	line-height: 14px;
	color: #f26535;
	font-weight: bold;
}
.box-side h4 { margin: 20px 0 10px 0; }
.box-side h5 {
	font-size: 11px;
	color: #5e6066;
	line-height: 18px;
	margin: 0 0 20px 0;
}
a.sub {
    background: url("images/subscribe-button.png") no-repeat scroll 0 0 transparent;
    color: #996633;
    display: block;
    height: 44px;
    line-height: 29px;
    margin: 0 auto;
    text-indent: -999em;
    width: 130px;
}
.box-side h4 a:hover {
	color: #f26535;
}
#box-or {
    background: #fff;
    font-size: 12px;
    font-weight: bold;
    height: 25px;
    line-height: 25px;
    margin: -115px 0 0 208px;
    position: absolute;
    width: 20px;
}
a:link, a:visited {
border:none;
}
.demo {
display:none;
}
Script.js
The final step is to initialize the modal window on page load and that too should open only on the first page load based on the cookies stored. This is quite helpful for bloggers to actually display the subscribe box just once for an individual visitors
jQuery(document).ready(function(){
    if (document.cookie.indexOf('visited=true') == -1) {
        var fifteenDays = 1000*60*60*24*15;
        var expires = new Date((new Date()).valueOf() +  fifteenDays);
        document.cookie = "visited=true;expires=" +  expires.toUTCString();
    $.colorbox({width:"480px", inline:true, href:"#subscribe"});
        }
});
In the script by default it is assigned to fifteen days of cookies storage, so if you want, you can change those values anytime. If your not sure about the number values, here is a little walkthrough
| Unit of Time | Milliseconds | |
|---|---|---|
| 1 second | 1000 | |
| 1 minute | second * 60 | (1000 * 60) |
| 1 hour | minute * 60 | (1000 * 60 * 60) |
| 1 day | hour * 24 | (1000 * 60 * 60 * 24 ) |
| 1 week | day * 7 | (1000 * 60 * 60 * 24 * 7 ) |
To change the number of days, all you need is to change the last ending number from 15 to any desired dates. The name fifteenDays is just used to mention those values. So its not required to changed the variable name.
Thats it. The tutorial is written to work on all platforms, so you guys need to figure out how to add it to your blog or website platform. I actually want to write about integrating into WordPress or something like that, but its not possible to wrap up everything in a single post.


